Showing posts with label Daring Bakers. Show all posts

Tuesday, 6 January 2009

December Daring Bakers Challenge - French Yule Log


Its time for Daring Bakers! Yay!

This month's challenge is brought to us by the adventurous Hilda from Saffron and Blueberry and Marion from Il en Faut Peu Pour Etre Heureux. They have chosen a French Yule Log by Flore from Florilege Gourmand

I am a little late as I was in a rural part of Australia, Streaky Bay, without access to a computer and I couldn’t do it before we left on 27 December as posting day was 28 December. Hopefully I am not banished for this. We shall see though, as Daring Bakers has become much more organised and regulated in 2009.

This time last year the Daring Bakers made a Yule Log so when I first saw the challenge was a Yule log, I was a little disappointed as I thought it was the same, but I have since learnt that a French Yule Log is very different! I must say, however, that I enjoyed last years much more in taste and preparation.

This recipe took a lot of time and effort to prepare, so please don’t attempt unless you have those 2 things in abundance, which I didn’t at this crazy time of year plus being 7 months pregnant!

Thanks you to Hilda and Marion for hosting Decembers challenge. It can’t be easy to choose a recipe that both hosts are happy with and that they imagine all Daring Bakers will be happy with! Hats off to you ladies!

I think as Daring Bakers we need to be honest and open and give our feedback on these recipes so that is what I will do. I did not enjoy this challenge, preparing or eating it. Disappointing huh? I think it was partly the recipe, and partly me and my kitchen! Firstly, it was about 32C degrees (90F), my kitchen light had blown and I couldn’t change it as the ceilings are so high, my KitchenAid was playing up and finally the batteries in my scales ran out. Humph.

The taste testers enjoyed this though and it looks like many of my fellow Daring Bakers did as well so don’t take too much notice of me. I’m terribly hormonal!

FRENCH YULE LOG RECIPE by Flore of Florilège Gourmand

Element #1 Dacquoise Biscuit (Almond Cake)

80g almond meal
50g icing sugar
15g plain flour
3 medium egg whites
50g sugar


Finely mix the almond meal and the confectioner's sugar. (If you have a mixer, you can use it by pulsing the ingredients together for no longer than 30 seconds).

Sift the flour into the mix.

Beat the eggs whites, gradually adding the granulated sugar until stiff.

Pour the almond meal mixture into the egg whites and blend delicately with a spatula.

Grease a piece of parchment paper and line your baking pan with it.

Spread the batter on a piece of parchment paper to an area slightly larger than your desired shape (circle, long strip etc...) and to a height of 1/3 inches (8mm).
Bake at 180°C for approximately 15 minutes Let cool and cut to the desired shape.

Element #2 Dark Chocolate Mousse

2.5 sheets gelatin or 5g powdered gelatin
40g sugar
10g glucose or golden syrup
15g water
3 medium egg yolks
175g dark chocolate, coarsely chopped
350g heavy cream (35% fat content)


Soften the gelatin in cold water. (If using powdered gelatin, follow the directions on the package.)

Make a Pate a Bombe: Beat the egg yolks until very light in colour (approximately 5 minutes until almost white).

Cook the sugar, glucose syrup and water on medium heat for approximately 3 minutes (if you have a candy thermometer, the mixture should reach 244°F (118°C). If you do not have a candy thermometer, test the sugar temperature by dipping the tip of a knife into the syrup then into a bowl of ice water, if it forms a soft ball in the water then you have reached the correct temperature.
Add the sugar syrup to the beaten yolks carefully by pouring it into the mixture in a thin stream while continuing to beat the yolks. You can do this by hand but it’s easier to do this with an electric mixer.

Continue beating until cool (approximately 5 minutes). The batter should become thick and foamy.

In a double boiler or equivalent, heat 2 tablespoons (30g) of cream to boiling. Add the chopped chocolate and stir until melted and smooth.

Whip the remainder of the cream until stiff.

Pour the melted chocolate over the softened gelatin, mixing well. Let the gelatin and chocolate cool slightly and then stir in ½ cup (100g) of WHIPPED cream to temper. Add the Pate a Bombe.

Add in the rest of the WHIPPED cream (220g) mixing gently with a spatula.

Element #3 Dark Chocolate Ganache Insert

50g sugar
135g heavy cream (35% fat content)
135g dark chocolate, finely chopped
45g unsalted butter, softened


Make a caramel: Using the dry method, melt the sugar by spreading it in an even layer in a small saucepan with high sides. Heat over medium-high heat, watching it carefully as the sugar begins to melt. Never stir the mixture. As the sugar starts to melt, swirl the pan occasionally to allow the sugar to melt evenly. Cook to dark amber color (for most of you that means darker than last month’s challenge).

While the sugar is melting, heat the cream until boiling. Pour cream into the caramel and stir thoroughly. Be very careful as it may splatter and boil.

Pour the hot caramel-milk mixture over the dark chocolate. Wait 30 seconds and stir
until smooth.

Add the softened butter and whip hard and fast (if you have a plunging mixer use it). The chocolate should be smooth and shiny.

Element #4 Praline Feuillete (Crisp) Insert


Note: Feuillete means layered (as in with leaves) so a Praline Feuillete is a Praline version of a delicate crisp. There are non-praline variations below. The crunch in this crisp comes from an ingredient which is called gavottes in French. Gavottes are lace-thin crepes. To our knowledge they are not available outside of France, so you have the option of making your own using the recipe below or you can simply substitute rice krispies or corn flakes or Special K for them. Special note: If you use one of the substitutes for the gavottes, you should halve the quantity stated, as in use 1oz of any of these cereals instead of 2.1oz.

60g of gavottes (lace crepes - recipe by Ferich Mounia):
80ml whole milk
8g unsalted butter
35g plain flour
15g beaten egg
3.5g sugar
½ tsp vegetable oil


Heat the milk and butter together until butter is completely melted. Remove from the heat.

Sift flour into milk-butter mixture while beating, add egg and granulated sugar. Make sure there are no lumps.

Grease a baking sheet and spread batter thinly over it.

Bake at 430°F (220°C) for a few minutes until the crepe is golden and crispy. Let cool.

Ingredients for the Praline Feuillete:
100g milk chocolate
25g butter
30g praline
2.1oz (60g) lace crepes(gavottes) or rice krispies or corn flakes or Special K (I used cornflakes)


Melt the chocolate and butter in a double boiler.

Add the praline and the coarsely crushed lace crepes. Mix quickly to thoroughly coat with the chocolate.

Spread between two sheets of wax paper to a size slightly larger than your desired shape. Refrigerate until hard.

Element #5 Vanilla Crème Brulée Insert

115g heavy cream (35% fat content)
115g whole milk
4 medium-sized egg yolks
25g sugar
1 vanilla bean


Heat the milk, cream, and scraped vanilla bean to just boiling. Remove from the stove and let the vanilla infuse for about 1 hour.

Whisk together the sugar and egg yolks (but do not beat until white).

Pour the vanilla-infused milk over the sugar/yolk mixture. Mix well.

Wipe with a very wet cloth and then cover your baking mold (whatever shape is going to fit on the inside of your Yule log/cake) with parchment paper. Pour the cream into the mold and bake at 210°F (100°C) for about 1 hour or until firm on the edges and slightly wobbly in the center.

Let cool and put in the freezer for at least 1 hour to firm up and facilitate the final assembly.

Element #6 Dark Chocolate Icing

½ Tbsp powdered gelatin or 2 sheets gelatin
60g heavy cream (35 % fat content)
60g granulated sugar
¼ cup water
30g unsweetened cocoa powder


Soften the gelatin in cold water for 15 minutes.

Boil the rest of the ingredients and cook an additional 3 minutes after boiling.

Add gelatin to the chocolate mixture. Mix well.

Let cool while checking the texture regularly. As soon as the mixture is smooth and coats a spoon well (it is starting to gelify), use immediately.

How To Assemble your French Yule Log

Depending on whether your mold is going to hold the assembly upside down until you unmold it or right side up, this order will be different.

THIS IS FOR UNMOLDING FROM UPSIDE DOWN TO RIGHT SIDE UP.

You will want to tap your mold gently on the countertop after each time you pipe mousse in to get rid of any air bubbles.

Line your mold or pan, whatever its shape, with rhodoid (clear hard plastic, I usually use transparencies cut to the desired shape, it’s easier to find than cellulose acetate which is what rhodoid translates to in English) OR plastic film. Rhodoid will give you a smoother shape but you may have a hard time using it depending on the kind of mold you’re using.

Pipe one third of the Mousse component into the mold.

Take the Creme Brulee Insert out of the freezer at the last minute and set on top of the mousse. Press down gently to slightly ensconce it in the mousse.

Pipe second third of the Mousse component around and on top of the Creme Brulee Insert.

Cut the Praline/Crisp Insert to a size slightly smaller than your mold so that it can be surrounded by mousse. Lay it on top of the mousse you just piped into the mold.

Pipe the last third of the Mousse component on top of the Praline Insert.

Freeze for a few hours to set. Take out of the freezer.

Pipe the Ganache Insert onto the frozen mousse leaving a slight edge so that ganache doesn’t seep out when you set the Dacquoise on top.

Close with the Dacquoise.

Freeze until the next day.

The next day...

Unmold the cake/log/whatever and set on a wire rack over a shallow pan.
Cover the cake with the icing.

Let set. Return to the freezer.
You may decorate your cake however you wish. The decorations can be set in the icing after it sets but before you return the cake to the freezer or you may attach them on top using extra ganache or leftover mousse, etc...

Transfer to the refrigerator no longer than ½ hour before serving as it may start to melt quickly depending on the elements you chose.

Sathya-rating **
Saturday, 29 November 2008

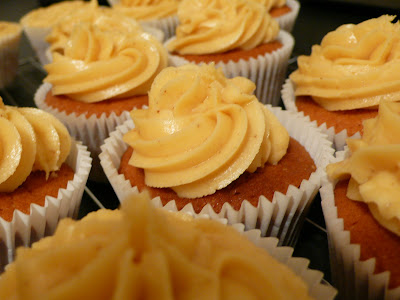
Daring Bakers November Challenge - Caramel Cake


It is that time of the month for many food blogs around the world to be taken over by the wonderful Daring Bakers - yay! I love it. I have missed some challenges unfortunately, and for this I apologise. Pregnancy has caused vomiting all day, every day for 6 months straight which hasn't helped my time in the kitchen (or anywhere for that matter!) but this month I managed to complete a challenge so here I am again.

This months task was set by Dolores with the help of Alex, Jenny and Natalie and is a gorgeous caramel cake recipe created by Shuna Fish Lydon.

As you can see, I decided to make cupcakes, which turned out successfully. I as worried I may have lost my touch with months of not baking but I was fine. I didn't find this recipe difficult at all, I don't know how others feel? My caramel syrup came up easily, the frosting mixed together nicely and the cakes were perfect. I prepared the syrup and frosting on a different day to the cakes and when realising just how sweet the frosting was halved the sugar in the cakes, which I am very happy about as they overall effect was still very sweet. I am a sweet tooth, so when I think something is very sweet, it really is!

I brought these along to a big family event this evening and one walk around the room on a tray and they all disappeared and seemed to be devoured just as quickly.

CARAMEL CAKE WITH CARAMELIZED BUTTER FROSTING

10 Tablespoons unsalted butter at room temperature
1 1/4 Cups granulated sugar
1/2 teaspoon kosher salt
1/3 Cup Caramel Syrup (see recipe below)
2 each eggs, at room temperature
splash vanilla extract
2 Cups all-purpose flour
1/2 teaspoon baking powder
1 cup milk, at room temperature


Preheat oven to 180C

Butter one tall (2 – 2.5 inch deep) 9-inch cake pan.

In the bowl of a stand mixer fitted with a paddle attachment, cream butter until smooth. Add sugar and salt & cream until light and fluffy.

Slowly pour room temperature caramel syrup into bowl. Scrape down bowl and increase speed. Add eggs/vanilla extract a little at a time, mixing well after each addition. Scrape down bowl again, beat mixture until light and uniform.

Sift flour and baking powder.

Turn mixer to lowest speed, and add one third of the dry ingredients. When incorporated, add half of the milk, a little at a time. Add another third of the dry ingredients, then the other half of the milk and finish with the dry ingredients. {This is called the dry, wet, dry, wet, dry method in cake making. It is often employed when there is a high proportion of liquid in the batter.}

Take off mixer and by hand, use a spatula to do a few last folds, making sure batter is uniform. Turn batter into prepared cake pan.

Place cake pan on cookie sheet or 1/2 sheet pan. Set first timer for 30 minutes, rotate pan and set timer for another 15-20 minutes. Your own oven will set the pace. Bake until sides pull away from the pan and skewer inserted in middle comes out clean. Cool cake completely before icing it.

CARAMEL SYRUP

2 cups sugar
1/2 cup water
1 cup water (for "stopping" the caramelization process)


In a small stainless steel saucepan, with tall sides, mix water and sugar until mixture feels like wet sand. Brush down any stray sugar crystals with wet pastry brush. Turn on heat to highest flame. Cook until smoking slightly: dark amber.

When color is achieved, very carefully pour in one cup of water. Caramel will jump and sputter about! It is very dangerous, so have long sleeves on and be prepared to step back.

Whisk over medium heat until it has reduced slightly and feels sticky between two fingers. {Obviously wait for it to cool on a spoon before touching it.}

Note: For safety reasons, have ready a bowl of ice water to plunge your hands into if any caramel should land on your skin.

CARAMELIZED BUTTER FROSTING

12 tablespoons unsalted butter
450g icing sugar, sifted
4-6 tablespoons heavy cream
2 teaspoons vanilla extract
2-4 tablespoons caramel syrup
Kosher or sea salt to taste


Cook butter until brown. Pour through a fine meshed sieve into a heatproof bowl, set aside to cool.

Pour cooled brown butter into mixer bowl.

In a stand mixer fitted with a paddle or whisk attachment, add confectioner's sugar a little at a time. When mixture looks too chunky to take any more, add a bit of cream and or caramel syrup. Repeat until mixture looks smooth and all confectioner's sugar has been incorporated. Add salt to taste.

Sathya-rating ***

Sunday, 31 August 2008

Daring Bakers August Challenge: Pierre Hermé’s Chocolate Éclairs


Yesterday was the last day I could possibly make August's Daring Bakers challenge. I had all the ingredients in the fridge, but had resigned myself to the fact I probably wouldn't make them. The kitchen hasn't been my favourite place since I found out I'm pregnant, the exhaustion and nauseous kills the fun, so I wasn't expecting to jump out of bed and feel like hours of whisking, beating, stirring and baking but I did! And, I am glad I did, these are so delicious! And it wasn't too complicated.

Tony Tahhan & Meeta set this months yummy chocolate-y challenge. Following our Daring Bakers forums this month, it seemed like a few people struggled so I was a little nervous but it all came together quite nicely. Now, I know my little creations don't look great, but I blame that on not having a big enough nozzle for my piping bag so I struggled to make the choux pastry into decent shapes (you should see the 'finger' style, eclairs ones - ha!). Yes, they don't look great but they tasted perfect if I may say so myself.

I was planning to make the pastry cream vanilla rather than chocolate but I had a visitor chatting to me whilst I was making these so I didn't pay close attention and suddenly realised I had made chocolate pastry cream! I'm glad I did to be honest, cos this component was my favourite - yum. Although this was my favourite, this pastry cream also annoyed me the most as I could not get it thick enough to pipe nicely into the choux pastries. Eventually I added some thick whipped cream which helped a little, but not enough. Its ok, people don't realise till they take a bite and yummy chocolate cream oozes all over them. Fun to watch if you ask me.

Please find the recipe below and if you want to check out my fellow Daring Bakers please do so here.

(Oh, I forgot to mention, I followed the recipe to the letter, but I halved the chocolate sauce ingredients at the end and it was plenty for the 7 tablespoons needed for the glaze).

Pierre Hermé’s Chocolate Éclairs
Cream Puff Dough (see below for recipe), fresh and still warm

1) Preheat your oven to 375 degrees F (190 degrees C). Divide the oven into thirds by
positioning the racks in the upper and lower half of the oven. Line two baking sheets with waxed or parchment paper.

2) Fill a large pastry bag fitted with a 2/3 (2cm) plain tip nozzle with the warm cream puff dough. Pipe the dough onto the baking sheets in long, 4 to 41/2 inches (about 11 cm) chubby fingers. Leave about 2 inches (5 cm) space in between each dough strip to allow them room to puff. The dough should give you enough to pipe 20-24 éclairs.

3) Slide both the baking sheets into the oven and bake for 7 minutes. After the 7 minutes, slip the handle of a wooden spoon into the door to keep in ajar. When the éclairs have been in the oven for a total of 12 minutes, rotate the sheets top to bottom and front to back. Continue baking for a further 8 minutes or until the éclairs are puffed, golden and firm. The total baking time should be approximately 20 minutes.

Assembling the éclairs:
• Chocolate glaze (see below for recipe)
• Chocolate pastry cream (see below for recipe)
1) Slice the éclairs horizontally, using a serrated knife and a gently sawing motion. Set aside the bottoms and place the tops on a rack over a piece of parchment paper.

2) The glaze should be barely warm to the touch (between 95 – 104 degrees F or 35 – 40 degrees C, as measured on an instant read thermometer). Spread the glaze over the tops of the éclairs using a metal icing spatula. Allow the tops to set and in the meantime fill the bottoms with the pastry cream.

3) Pipe or spoon the pastry cream into the bottoms of the éclairs. Make sure you fill the bottoms with enough cream to mound above the pastry. Place the glazed tops onto the pastry cream and wriggle gently to settle them.

Cream Puff Dough
½ cup (125g) whole milk
½ cup (125g) water
1 stick (4 ounces; 115g) unsalted butter, cut into 8 pieces
¼ teaspoon sugar
¼ teaspoon salt
1 cup (140g) all-purpose flour
5 large eggs, at room temperature


1) In a heavy bottomed medium saucepan, bring the milk, water, butter, sugar and salt to the boil.

2) Once the mixture is at a rolling boil, add all of the flour at once, reduce the heat to medium and start to stir the mixture vigorously with a wooden spoon. The dough comes together very quickly. Do not worry if a slight crust forms at the bottom of the pan, it’s supposed to. You need to carry on stirring for a further 2-3 minutes to dry the dough. After this time the dough will be very soft and smooth.

3) Transfer the dough into a bowl of a mixer fitted with the paddle attachment, or using your handmixer or if you still have the energy, continue by hand. Add the eggs one at a time, beating after each egg has been added to incorporate it into the dough.
You will notice that after you have added the first egg, the dough will separate, once again do not worry. As you keep working the dough, it will come back all together again by the time you have added the third egg. In the end the dough should be thick and shiny and when lifted it should fall back into the bowl in a ribbon.

4) The dough should be still warm. It is now ready to be used for the éclairs as directed above.

Chocolate Pastry Cream
2 cups (500g) whole milk
4 large egg yolks
6 tbsp (75g) sugar
3 tablespoons cornstarch, sifted
7 oz (200g) bittersweet chocolate, melted
2½ tbsp (1¼ oz: 40g) unsalted butter, at room temperature


1) In a small saucepan, bring the milk to a boil. In the meantime, combine the yolks, sugar and cornstarch together and whisk in a heavy‐bottomed saucepan.

2) Once the milk has reached a boil, temper the yolks by whisking a couple spoonfuls of the hot milk into the yolk mixture. Continue whisking and slowly pour the rest of the milk into the tempered yolk mixture.

3) Strain the mixture back into the saucepan to remove any egg that may have scrambled. Place the pan over medium heat and whisk vigorously (without stop) until the mixture returns to a boil. Keep whisking vigorously for 1 to 2 more minutes (still over medium heat).Stir in the melted chocolate and then remove the pan from the heat.

4) Scrape the pastry cream into a small bowl and set it in an ice‐water bath to stop the cooking process. Make sure to continue stirring the mixture at this point so that it remains smooth.

5) Once the cream has reached a temperature of 140 F remove from the ice‐water bath and stir in the butter in three or four instalments. Return the cream to the ice‐water bath to continue cooling, stirring occasionally, until it has completely cooled. The cream is now ready to use or store in the fridge.

Chocolate Glaze
1/3 cup (80g) heavy cream
3½ oz (100g) bittersweet chocolate, finely chopped
4 tsp (20 g) unsalted butter, cut into 4 pieces, at room temperature
7 tbsp (110 g) Chocolate Sauce (recipe below), warm or at room temperature


1)In a small saucepan, bring the heavy cream to a boil. Remove from the heat and slowly begin to add the chocolate, stirring with a wooden spoon or spatula.

2) Stirring gently, stir in the butter, piece by piece followed by the chocolate sauce.

Chocolate Sauce
4½ oz (130 g) bittersweet chocolate, finely chopped
1 cup (250 g) water
½ cup (125 g) crème fraîche, or heavy cream
1/3 cup (70 g) sugar


1) Place all the ingredients into a heavy‐bottomed saucepan and bring to a boil, making sure to stir constantly. Then reduce the heat to low and continue stirring with a wooden spoon until the sauce thickens.

2) It may take 10‐15 minutes for the sauce to thicken, but you will know when it is done when it coats the back of your spoon.

Sathya-rating ****

Wednesday, 30 July 2008

July Daring Bakers Challenge - Hazelnut gateau with praline butttercream


Its that time of the month for us to share our July Daring Bakers challenge with you! Yay. I love it when we get to share it, as it means the hard work is over and we get to find out soon what our next challenge is… Something without buttercream I hope!

July’s challenge, a hazelnut gateau with praline buttercream, was set by Melecotte and was awesome! Everyone loved it. I think this and the Danish Braid we did last month are my favorites so far.

I struggled with this challenge though. I think I went in too confident (as we as Daring Bakers have completed the genoise and buttercream a few times now). The cake part went fine, the glaze went fine, but the buttercream, (the blooming buttercream) wouldn’t work for me! The first attempt was lumpy as I tried to cut corners by not creaming the butter before adding it to the egg mix, so I started again. This time I followed the instructions to the letter and it just wouldn’t come together, it looked like it was curdled. But, I just kept on beating and it came together perfectly in the end. Sometimes you just gotta keep on beating. Thank goodness, as it was the best part. How could you go wrong with praline though, I ask you!

I made this cake for my youngest sister, Sals birthday and she loved it, which is the only person I really cared about. I packed ¾ of the cake up for her and she took it to work and she tells me everyone there loved it too and thought she’d bought it! That’s a compliment in my books. Or maybe not! Haha. Anyway, the recipe is to follow and if you want to look at what my fellow DB members got up to have a look here.

Filbert Gateau with Praline Buttercream
From Great Cakes by Carol Walter

1 Filbert Gateau
1 recipe sugar syrup, flavored with dark rum
1 recipe Praline Buttercream
½ cup heavy cream, whipped to soft peaks
1 recipe Apricot Glaze
1 recipe Ganache Glaze, prepared just before using
3 tablespoons filberts, toasted and coarsely chopped


Filbert Gateau

Because of the amount of nuts in the recipe, this preparation is different from a classic genoise.

1 ½ cups hazelnuts, toasted/skinned
2/3 cup cake flour, unsifted
2 Tbsp. cornstarch
7 large egg yolks
1 cup sugar, divided ¼ & ¾ cups
1 tsp. vanilla extract
½ tsp. grated lemon rind
5 lg. egg whites
¼ cup warm, clarified butter (100 – 110 degrees)


Position rack in the lower 3rd of the oven and preheat to 180C. Grease and flour a 25.5cm X 6cm round cake pan.

Using a food processor, process nuts, cake flour, and cornstarch for about 30 seconds. Then, pulse the mixture about 10 times to get a fine, powdery mixture. You’ll know the nuts are ready when they begin to gather together around the sides of the bowl. While you want to make sure there aren’t any large pieces, don’t over-process. Set aside.

Put the yolks in the bowl of an electric mixer, with the whisk attachment, and beat until thick and light in color, about 3-4 minutes on med-high speed. Slowly, add ¾ cup of sugar. It is best to do so by adding a tablespoon at a time, taking about 3 minutes for this step. When finished, the mixture should be ribbony. Blend in the vanilla and grated lemon rind. Remove and set aside.

Place egg whites in a large, clean bowl of the electric mixer with the whisk attachment and beat on medium speed, until soft peaks. Increase to med-high speed and slowly add the remaining ¼ cup of sugar, over 15-20 seconds or so. Continue to beat for another ½ minute.
Add the yolk mixture to the whites and whisk for 1 minute.

Pour the warm butter in a liquid measure cup (or a spouted container). * It must be a deep bottom bowl and work must be fast.* Put the nut meal in a mesh strainer (or use your hand – working quickly) and sprinkle it in about 2 tablespoons at a time – folding it carefully for about 40 folds. Be sure to exclude any large chunks/pieces of nuts. Again, work quickly and carefully as to not deflate the mixture. When all but about 2 Tbsp. of nut meal remain, quickly and steadily pour the warm butter over the batter. Then, with the remaining nut meal, fold the batter to incorporate, about 13 or so folds.

With a rubber spatula, transfer the batter into the prepared pan, smoothing the surface with the spatula or back of a spoon. **If collected butter remains at the bottom of the bowl, do not add it to the batter! It will impede the cake rising while baking.

Tap the pan on the counter to remove air bubbles and bake in the preheated oven for 30-35 minutes. You’ll know the cake is done when it is springy to the touch and it separates itself from the side of the pan. Remove from oven and allow to stand for 5 minutes. Invert onto a cake rack sprayed with nonstick coating, removing the pan. Cool the cake completely.

*If not using the cake right away, wrap thoroughly in plastic wrap, then in a plastic bag, then in the refrigerator for up to 3 days. If freezing, wrap in foil, then the bag and use within 2-3 months.

Sugar Syrup
Makes 1 cup, good for one 10-inch cake – split into 3 layers

1 cup water
¼ cup sugar
2 Tbsp. dark rum or orange flavored liqueur


In a small, yet heavy saucepan, bring the water and sugar to a boil and simmer for 5 minutes. Remove from heat, add the liqueur. Cool slightly before using on the cake. *Can be made in advance.

Praline Buttercream
1 recipe Swiss Buttercream
1/3 cup praline paste
1 ½ - 2 Tbsp. Jamaican rum (optional)


Blend ½ cup buttercream into the paste, then add to the remaining buttercream. Whip briefly on med-low speed to combine. Blend in rum.

Swiss Buttercream
4 lg. egg whites
¾ cup sugar
1 ½ cups (3 sticks) unsalted butter, slightly firm
1 ½ -2 Tbsp. Grand Marnier or liqueur of your choice
1 tsp. vanilla


Place the egg whites in a lg/ bowl of a electric mixer and beat with the whisk attachment until the whites are foamy and they begin to thicken (just before the soft peak stage). Set the bowl over a saucepan filled with about 2 inches of simmering water, making sure the bowl is not touching the water. Then, whisk in the sugar by adding 1-2 tablespoon of sugar at a time over a minutes time. Continue beating 2-3 minutes or until the whites are warm (about 120 degrees) and the sugar is dissolved. The mixture should look thick and like whipped marshmallows.
Remove from pan and with either the paddle or whisk attachment, beat the egg whites and sugar on med-high until its a thick, cool meringue – about 5-7 minutes. *Do not overbeat*. Set aside.

Place the butter in a separate clean mixing bowl and, using the paddle attachment, cream the butter at medium speed for 40-60 seconds, or until smooth and creamy. *Do not overbeat or the butter will become toooooo soft.*

On med-low speed, blend the meringue into the butter, about 1-2 Tbsp. at a time, over 1 minute. Add the liqueur and vanilla and mix for 30-45 seconds longer, until thick and creamy.

Refrigerate 10-15 minutes before using.

Refrigerate in an airtight container for up to 5 days, or can be frozen for up to 6 months. If freezing, store in 2 16-oz. plastic containers and thaw in the refrigerator overnight or at room temperature for several hours.

Praline Paste
1 cup (4 ½ oz.) Hazelnuts, toasted/skinless
2/3 cup Sugar
Line a jelly roll pan with parchment and lightly butter.


Put the sugar in a heavy 10-inch skillet. Heat on low flame for about 10-20 min until the sugar melts around the edges. Do not stir the sugar. Swirl the pan if necessary to prevent the melted sugar from burning. Brush the sides of the pan with water to remove sugar crystals. If the sugar in the center does not melt, stir briefly. When the sugar is completely melted and caramel in color, remove from heat. (160C) Stir in the nuts with a wooden spoon and separate the clusters. Return to low heat and stir to coat the nuts on all sides. Cook until the mixture starts to bubble. **Remember – extremely hot mixture.** Then onto the parchment lined sheet and spread as evenly as possible. As it cools, it will harden into brittle. Break the candied nuts into pieces and place them in the food processor. Pulse into a medium-fine crunch or process until the brittle turns into a powder. To make paste, process for several minutes. Store in an airtight container and store in a cook dry place. Do not refrigerate.

Apricot Glaze
Good for one 10-inch cake

2/3 cup thick apricot preserves
1 Tbsp. water


In a small, yet heavy saucepan, bring the water and preserves to a slow boil and simmer for 2-3 minutes. If the mixture begins to stick to the bottom of the saucepan, add water as needed.

Remove from heat and, using a strainer, press the mixture through the mesh and discard any remnants. With a pastry brush, apply the glaze onto the cake while the cake is still warm. If the glaze is too thick, thin to a preferred consistency with drops of water.

Ganache Glaze
Makes about 1 cup, enough to cover the top and sides of a 9 or 10 inch layer or tube cake

**Ganache can take on many forms. While warm – great fudge sauce. While cool or lukewarm – semisweet glaze. Slightly chilled – can be whipped into a filling/frosting. Cold & solid – the base of candied chocolate truffles.

6 oz. (good) semisweet or bittersweet chocolate, like Lindt
6 oz. (¾ cup heavy cream
1 tbsp. light corn syrup
1 Tbsp. Grand Marnier, Cointreay, or dark Jamaican rum (optional)
¾ tsp. vanilla
½ - 1 tsp. hot water, if needed


Blend vanilla and liqueur/rum together and set aside.

Break the chocolate into 1-inch pieces and place in the basket of a food processor and pulse until finely chopped. Transfer into a medium sized bowl and set aside.

Heat the cream and corn syrup in a saucepan, on low, until it reached a gentle boil. Once to the gently boil, immediately and carefully pour over the chocolate. Leave it alone for one minute, then slowly stir and mix the chocolate and cream together until the chocolate is melted and incorporated into the cream. Carefully blend in vanilla mixture. If the surface seems oily, add ½ - 1 tsp hot water. The glaze will thicken, but should still be pourable. If it doesn’t thicken, refrigerate for about 5 minutes, but make sure it doesn’t get too cold!

Assembling Cake

Cut a cardboard disk slightly smaller than the cake. Divide the cake into 3 layers and place the first layer top-side down on the disk. Using a pastry brush, moisten the layer with 3-4 Tbsp. of warm sugar syrup. Measure out 1 cup of praline buttercream and set aside.

Spread the bottom layer with a ¼-inch thickness of the remaining buttercream. Cover with ½ of the whipped cream, leaving ¼-inch border around the edge of the cake. Place the middle layer over the first, brush with sugar syrup, spreading with buttercream. Cover with the remaining whipped cream.

Moisten the cut side of the third layer with additional sugar syrup and place cut side down on the cake. Gently, press the sides of the cake to align the layers. Refrigerate to chill for at least 30 minutes.

Lift the cake by sliding your palm under the cardboard. Holding a serrated or very sharp night with an 8-ich blade held parallel to the sides of the cake, trim the sides so that they are perfectly straight. Cut a slight bevel at the top to help the glaze drip over the edge. Brush the top and sides of the cake with warm apricot glaze, sealing the cut areas completely. Chill while you prepare the ganache.

Place a rack over a large shallow pan to catch the ganache drippings. Remove the gateau from the refrigerator and put it the rack. With a metal spatula in hand, and holding the saucepan about 10 inches above the cake, pour the ganache onto the cake’s center. Move the spatula over the top of the ganache about 4 times to get a smooth and mirror-like appearance. The ganache should cover the top and run down the sides of the cake. When the ganache has been poured and is coating the cake, lift one side of the rack and bang it once on the counter to help spread the ganache evenly and break any air bubbles. (Work fast before setting starts.) Patch any bare spots on the sides with a smaller spatula, but do not touch the top after the “bang”. Let the cake stand at least 15 minutes to set after glazing.

To garnish the cake, fit a 12 – 14-inch pastry bag with a #114 large leaf tip. Fill the bag with the reserved praline cream. Stating ½ inch from the outer edge of the cake, position the pastry tube at a 90 degree angle with the top almost touching the top of the cake. Apply pressure to the pastry bag, moving it slightly toward the center of the cake. As the buttercream flows on the cake, reverse the movement backward toward the edge of the cake and finish by pulling the bag again to the center. Stop applying pressure and press the bag downward, then quickly pull the tip up to break the flow of frosting. Repeat, making 12 leaves evenly spaced around the surface of the cake.

Make a second row of leaves on the top of the first row, moving the pastry bag about ¾ inch closer to the center. The leaves should overlap. Make a 3rd row, moving closer and closer to the center. Add a 4th row if you have the room. But, leave a 2-inch space in the center for a chopped filbert garnish. Refrigerate uncovered for 3-4 hours to allow the cake to set. Remove the cake from the refrigerator at least 3 hours before serving.

Leftover cake can be covered with foil and kept in the refrigerator for up to 5 days.


Sathya-rating ****

Sunday, 29 June 2008

June DB Challenge - Cherry & Custard Danish Braid


It's the end of June, which means time has come for the Daring Bakers to take over the blog-waves again!

This month we were set the enormous challenge of a Danish Braid with a filling of our choice.

Hours before I discovered this challenge, I was having lunch with dear Laura, who was telling me all about these amazing German custard and cherry pastries she devoured when she was working in Hahndorf, South Australia.

So by the time I'd finished reading the recipe for this latest challenge I knew I would use a cherry and custard filling and started thinking of how I could do that. I ended up finding a jar of morello cherries in juice at the supermarket, boiling them down with some sugar and mushing them to create a yummy compote. I glugged some custard on top and closed my braid and the end result was heavenly. Sour and sweet with flaky, sweet and buttery pastry.

The challenge took me a long time with all the resting (5 times + proofing) (one night and one morning which I didn't enjoy this time. I think because it was stopping and starting. The actual making of the braid part was fiddly but enjoyed it and the end result looked really special, which made it all worthwhile (as did the taste!). I made one large one and 1 small one, which I froze after proofing, defrosted in the fridge over night and then the next day took it out of the fridge for a few hours before popping it in the oven, and it worked fine, which is always good. Overall, I really enjoyed this challenge, I think the end result was my favourite out of all 11 challenges I have now completed, it was yum! I don't think the process was though, and I doubt I will be making Danish pastry from scratch again, although who knows!

If you would like to check out how my fellow Daring Bakers went with their Danish Braids this month you can do so here.

For the dough (Detrempe)
28 grams active dry yeast
1/2 cup whole milk
1/3 cup sugar
Zest of 1 orange, finely grated
3/4 tsp ground cardamom
1 1/2 tsp vanilla extract
1/2 vanilla bean, split and scraped
2 large eggs, chilled
1/4 cup fresh orange juice
3 1/4 cups plain flour
1 tsp salt

For the butter block (Beurrage)
225 grams cold unsalted butter
1/4 cup flour

DOUGH

Combine yeast and milk in the bowl of a mixer fitted with the paddle attachment and mix on low speed. Slowly add sugar, orange zest, cardamom, vanilla extract, vanilla seeds, eggs, and orange juice. Mix well. Change to the dough hook and add the salt with the flour, 1 cup at a time, increasing speed to medium as the flour is incorporated. Knead the dough for about 5 minutes, or until smooth. You may need to add a little more flour if it is sticky. Transfer dough to a lightly floured baking sheet and cover with plastic wrap. Refrigerate for 30 minutes.

Without a standing mixer: Combine yeast and milk in a bowl with a hand mixer on low speed or a whisk. Add sugar, orange zest, cardamom, vanilla extract, vanilla seeds, eggs, and orange juice and mix well. Sift flour and salt on your working surface and make a fountain. Make sure that the "walls" of your fountain are thick and even. Pour the liquid in the middle of the fountain. With your fingertips, mix the liquid and the flour starting from the middle of the fountain, slowly working towards the edges. When the ingredients have been incorporated start kneading the dough with the heel of your hands until it becomes smooth and easy to work with, around 5 to 7 minutes. You might need to add more flour if the dough is sticky.

BUTTER BLOCK

Combine butter and flour in the bowl of a mixer fitted with a paddle attachment and beat on medium speed for 1 minute. Scrape down the sides of the bowl and the paddle and then beat for 1 minute more, or until smooth and lump free. Set aside at room temperature.

After the detrempe has chilled 30 minutes, turn it out onto a lightly floured surface. Roll the dough into a rectangle approximately 45 x 33 cm and 0.5 cm thick. The dough may be sticky, so keep dusting it lightly with flour. Spread the butter evenly over the center and right thirds of the dough. Fold the left edge of the detrempe to the right, covering half of the butter. Fold the right third of the rectangle over the center third. The first turn has now been completed. Mark the dough by poking it with your finger to keep track of your turns, or use a sticky and keep a tally. Place the dough on a baking sheet, wrap it in plastic wrap, and refrigerate for 30 minutes.

Place the dough lengthwise on a floured work surface. The open ends should be to your right and left. Roll the dough into another approximately 33 x 45 cm, 0.5 cm thick rectangle. Again, fold the left third of the rectangle over the center third and the right third over the center third. No additional butter will be added as it is already in the dough. The second turn has now been completed. Refrigerate the dough for 30 minutes.

Roll out, turn, and refrigerate the dough two more times, for a total of four single turns. Make sure you are keeping track of your turns. Refrigerate the dough after the final turn for at least 5 hours or overnight. The Danish dough is now ready to be used. If you will not be using the dough within 24 hours, freeze it. To do this, roll the dough out to about 1 inch in thickness, wrap tightly in plastic wrap, and freeze. Defrost the dough slowly in the refrigerator for easiest handling. Danish dough will keep in the freezer for up to 1 month.

Cherry compote
Makes enough for two braids

500 grams cherries, washed, pitted and halved (or 1 jar of morello cherries)
1/2 cup water
1/4 cup lemon juice
1/2 cup sugar
1 tablespoon cornstarch
1 tablespoon kirsch, or orange flavored-liqueur

In a medium saucepan, combine the cherries, water, lemon juice, and sugar.

Bring to a boil. Reduce the heat to medium-low and simmer for 15 minutes, stirring occasionally.

In a small bowl, combine the cornstarch and kirsch and add to the cherry mixture.

Return to a boil and cook for 1 minute, stirring. Reduce the heat to low and simmer until thickened, about 4 minutes.

DANISH BRAID

Makes enough for 2 large braids

Ingredients

1 recipe Danish Dough (see below)
2 cups cherry compote
1 cup of thick vanilla custard
2 tbs flaked almonds (for decorating)
For the egg wash: 1 large egg, plus 1 large egg yolk

Line a baking sheet with a silicone mat or parchment paper. On a lightly floured surface, roll the Danish Dough into a 38 x 50 cm rectangle, 0.5 cm thick. If the dough seems elastic and shrinks back when rolled, let it rest for a few minutes, then roll again. Place the dough on the baking sheet.

Along one long side of the pastry make parallel, 12 cm long cuts with a knife or rolling pastry wheel, each about 2.5 cm apart. Repeat on the opposite side, making sure to line up the cuts with those you've already made.

Spoon the cherry compote onto down the center of the rectangle of the braid and then glug a little custard over the top of your braid.


Starting with the top and bottom "flaps", fold the top flap down over the filling to cover. Next, fold the bottom "flap" up to cover filling. This helps keep the braid neat and helps to hold in the filling. Now begin folding the cut side strips of dough over the filling, alternating first left, then right, left, right, until finished. Trim any excess dough and tuck in the ends.

Egg Wash

Whisk together the whole egg and yolk in a bowl and with a pastry brush, lightly coat the braid.

Proofing and Baking

Spray cooking oil onto a piece of plastic wrap, and place over the braid. Proof at room temperature or, if possible, in a controlled 32 degree C environment for about 2 hours, or until doubled in volume and light to the touch.

Near the end of proofing, preheat oven to 200 degrees C. Position a rack in the center of the oven.

Bake for 10 minutes, then rotate the pan so that the side of the braid previously in the back of the oven is now in the front. Lower the oven temperature to 180 degrees C, and bake about 15-20 minutes more, or until golden brown. Cool and serve the braid either still warm from the oven or at room temperature. The cooled braid can be wrapped airtight and stored in the refrigerator for up to 2 days, or freeze for 1 month.

Wednesday, 28 May 2008

Lavender & White Chocolate Opéra Cake - Daring Bakers May Challenge


Herewith I share with you my 10th Daring Bakers Challenge - Opéra Cake. Ta-da!

Do you know what that is? I didn't. I had to read up and look through Google images. I realised immediately this was something I had eaten at a glorious high tea at the Sofitel Wentworth a few months ago. According to Larousse Gastronomique "Opéra gateau is an elaborate almond sponge cake with a coffee and chocolate filling and icing." The founders of our wonderful Daring Bakers group, Lis & Ivonne set this months challenge with clear instructions to follow the recipe but adapt the flavourings to our likings as long as the overall appearance was light in colour.

I threw around many ideas for about a week and eventually decided on an old favourite flavouring, Lavender which I had mainly used for pannacottas (that reminds me, I don't think I've done them on BCM - I will soon!).

So Lavender and White Chocolate it was. I followed the recipe we were given to the letter, however I flavoured the soaking syrup with a few leaves of lavender, the white chocolate mousse with a few more leaves of lavender and several strategic drops of food colouring.

I hope you like the look of this - I worked very hard to complete this in one evening. It went down very well, but next time I share it around I will be cutting pieces half the size as it was incredibly rich! I enjoyed this recipe immensely. As I've said many times now, my confidence gets better every time I complete a challenge and this was no exception.

If you would like to see how my fellow Daring Bakers went, please head on over to the Daring Bakers Blogroll.

Here's what I did.

A Taste of Light: Opéra Cake

This recipe is based on Opéra Cake recipes in Dorie Greenspan's Paris Sweets and Tish Boyle and Timothy Moriarty's Chocolate Passion.


For the joconde

(Note: The joconde can be made up to 1 day in advance and kept wrapped at room temperate)

What you'll need:

2 12½ x 15½-inch (31 x 39-cm) jelly-roll pans
a few tablespoons of melted butter (in addition to what's called for in the ingredients' list) and a brush (to grease the pans)
parchment paper
a whisk and a paddle attachment for a stand mixer or for a handheld mixer
two mixing bowls (you can make do with one but it's preferable to have two)

Ingredients:

6 large egg whites, at room temperature
2 tbsp. (30 grams) white sugar
2 cups (225 grams) ground blanched almonds
2 cups icing sugar, sifted
6 large eggs
½ cup (70 grams) all-purpose flour
3 tbsp. (1½ ounces; 45 grams) unsalted butter, melted and cooled


Divide the oven into thirds by positioning a rack in the upper third of the oven and the lower third of the oven.

Preheat the oven to 425◦F. (220◦C).

Line two 12½ x 15½- inch (31 x 39-cm) jelly-roll pans with parchment paper and brush with melted butter.

In the bowl of a stand mixer fitted with the whisk attachment (or using a handheld mixer), beat the egg whites until they form soft peaks. Add the granulated sugar and beat until the peaks are stiff and glossy. If you do not have another mixer bowl, gently scrape the meringue into another bowl and set aside.

If you only have one bowl, wash it after removing the egg whites or if you have a second bowl, use that one. Attach the paddle attachment to the stand mixer (or using a handheld mixer again) and beat the almonds, icing sugar and eggs on medium speed until light and voluminous, about 3 minutes.

Add the flour and beat on low speed until the flour is just combined (be very careful not to overmix here!!!).

Using a rubber spatula, gently fold the meringue into the almond mixture and then fold in the melted butter. Divide the batter between the pans and spread it evenly to cover the entire surface of each pan.

Bake the cake layers until they are lightly browned and just springy to the touch. This could take anywhere from 5 to 9 minutes depending on your oven. Place one jelly-roll pan in the middle of the oven and the second jelly-roll pan in the bottom third of the oven.

Put the pans on a heatproof counter and run a sharp knife along the edges of the cake to loosen it from the pan. Cover each with a sheet of parchment or wax paper, turn the pans over, and unmold.

Carefully peel away the parchment, then turn the parchment over and use it to cover the cakes. Let the cakes cool to room temperature.

For the syrup

(Note: The syrup can be made up to 1 week in advance and kept covered in the refrigerator.)

What you'll need:

a small saucepan

Ingredients:

½ cup (125 grams) water
⅓ cup (65 grams) granulated sugar
1 3 -5 cm piece of lavender leaves


Stir all the syrup ingredients together in the saucepan and bring to a boil.

Remove from the heat and let cool to room temperature.

For the buttercream

(Note: The buttercream can be made up to 1 month in advance and packed in an airtight container. If made way in advance, you can freeze the buttercream. Alternatively you can refrigerate it for up to 4 days after making it. To use the buttercream simply bring it to room temperature and then beat it briefly to restore its consistency.)

What you'll need:

a small saucepan
a candy or instant-read thermometer
a stand mixer or handheld mixer
a bowl and a whisk attachment
rubber spatula

Ingredients:

2 cups sugar
1/2 cup water
seeds of one vanilla bean
1 large egg
1 large egg yolk
1¾ cups unsalted butter, at room temperature
3 tablespoons of melted white chocolate


Combine the sugar, water and vanilla bean seeds or extract in a small saucepan and warm over medium heat just until the sugar dissolves.

Continue to cook, without stirring, until the syrup reaches 225◦F (107◦C) [*Note: Original recipe indicates a temperature of 255◦F (124◦C), however, when testing the recipe I found that this was too high so we heated to 225◦F and it worked fine] on a candy or instant-read thermometer. Once it reaches that temperature, remove the syrup from the heat.

While the syrup is heating, begin whisking the egg and egg yolk at high speed in the bowl of your mixer using the whisk attachment. Whisk them until they are pale and foamy.

When the sugar syrup reaches the correct temperature and you remove it from the heat, reduce the mixer speed to low speed and begin slowly (very slowly) pouring the syrup down the side of the bowl being very careful not to splatter the syrup into the path of the whisk attachment. Some of the syrup will spin onto the sides of the bowl but don't worry about this and don't try to stir it into the mixture as it will harden!

Raise the speed to medium-high and continue beating until the eggs are thick and satiny and the mixture is cool to the touch (about 5 minutes or so).

While the egg mixture is beating, place the softened butter in a bowl and mash it with a spatula until you have a soft creamy mass.

With the mixer on medium speed, begin adding in two-tablespoon chunks. When all the butter has been incorporated, raise the mixer speed to high and beat until the buttercream is thick and shiny.

At this point add in the white chocolate and beat for an additional minute or so.


Refrigerate the buttercream, stirring it often, until it's set enough (firm enough) to spread when topped with a layer of cake (about 20 minutes).

(Note: The mousse can be made ahead and refrigerated until you're ready to use it.)

What you'll need:

a small saucepan
a mixer or handheld mixer

Ingredients:

7 ounces (200g) white chocolate
1 cup plus 3 tbsp. heavy cream (35% cream
)

Melt the white chocolate and the 3 tbsp. of heavy cream in a small saucepan.

Stir to ensure that it's smooth and that the chocolate is melted. Add the tablespoon of liqueur to the chocolate and stir. Set aside to cool completely.

In the bowl of a stand mixer, whip the remaining 1 cup of heavy cream until soft peaks form.

Gently fold the whipped cream into the cooled chocolate to form a mousse. If it's too thin, refrigerate it for a bit until it's spreadable.

If you're not going to use it right away, refrigerate until you're ready to use.

For the glaze
(Note: It's best to make the glaze right when you're ready to finish the cake.)

What you'll need:

a small saucepan or double boiler

Ingredients:

14 ounces (400g) white chocolate, coarsely chopped
½ cup heavy cream (35% cream)
5 - 8 cm piece of lavender leaves


Melt the white chocolate with the heavy cream and the piece of lavender. Whisk the mixture gently until smooth.

Let cool for 10 minutes, remove the lavender and then pour over the chilled cake. Using a long metal cake spatula, smooth out into an even layer.

Place the cake into the refrigerator for 30 minutes to set.

Assembling the Opéra Cake

(Note: The finished cake should be served slightly chilled. It can be kept in the refrigerator for up to 1 day).

Line a baking sheet with parchment or wax paper.

Working with one sheet of cake at a time, cut and trim each sheet so that you have two pieces (from each cake so you'll have four pieces in total): one 10-inch (25-cm) square and one 10 x 5-inch (25 x 12½-cm) rectangle.

Place one square of cake on the baking sheet and moisten it gently with the flavoured syrup.

Spread about three-quarters of the buttercream over this layer.

Top with the two rectangular pieces of cake, placing them side by side to form a square. Moisten these pieces with the flavoured syrup.

Spread the remaining buttercream on the cake and then top with the third square of joconde. Use the remaining syrup to wet the joconde and then refrigerate until very firm (at least half an hour).

Prepare the ganache/mousse (if you haven't already) and then spread it on the top of the last layer of the joconde. Refrigerate for at least two to three hours to give the ganache/mousse the opportunity to firm up.

Make the glaze and after it has cooled, pour/spread it over the top of the chilled cake. Refrigerate the cake again to set the glaze.

Serve the cake slightly chilled. This recipe will yield approximately 20 servings.


Sathya-rating ****

Monday, 28 April 2008

April Daring Bakers Challenge - Cheesecake Pops


Its the end of April, which means it Daring Bakers challenge time. This month one of my favourite bloggers, Deborah from Taste & Tell joined Elle from Feeding My Enthusiasm choose the challenge - Cheesecake Pops. I was quite excited to see this recipe originally as I've never made a baked cheesecake and have not really 'played' with food like this to form it into something so fun.

We're moving back to Adelaide, South Australia from Sydney next week so I wasn't sure I'd be able to complete the challenge but things came together and I managed to make them this weekend for my gorgeous friends Stacy and Will who are kindly looking after us at the moment as we had to get get out of our apartment quicker than we thought.

I loved this challenge, the pops taste fantastic and I didn't struggle with any of the tasks. The only slight difficulty was the fact there are no beaters in this kitchen, so it took me a long time to combine everything to the right consistency. It made me realise how much I love my gorgeous red KitchenAid! I will definitely be making these again, maybe not us 'pops' but the cheesecake part for sure. It'll be a breeze with the KitchenAid.

Thank Elle and Deborah, this was a lot of fun. If you would like to check out my fellow challengers, please do so here.

Makes 30 – 40 Pops
5 x 225g packages cream cheese at room temperature
2 cups sugar
¼ cup flour
¼ tsp salt
5 large eggs
2 egg yolks
2 teaspoons pure vanilla extract
¼ cup heavy cream
Boiling water as needed
Thirty to forty 8-inch lollipop sticks
450g milk chocolate, finely chopped milk
2 tbs vegetable shortening
Assorted decorations such as chopped nuts, colored jimmies, crushed peppermints, mini chocolate chips, sanding sugars) - Optional


Position oven rack in the middle of the oven and preheat to 160C. Set some water to boil.

In a large bowl, beat together the cream cheese, sugar, flour, and salt until smooth. If using a mixer, mix on low speed. Add the whole eggs and the egg yolks, one at a time, beating well (but still at low speed) after each addition. Beat in the vanilla and cream.

Grease a 10-inch cake pan (not a springform pan), and pour the batter into the cake pan. Place the pan in a larger roasting pan. Fill the roasting pan with the boiling water until it reaches halfway up the sides of the cake pan. Bake until the cheesecake is firm and slightly golden on top, 35 to 45 minutes.

Remove the cheesecake from the water bath and cool to room temperature. Cover the cheesecake with plastic wrap and refrigerate until very cold, at least 3 hours or up to overnight.

When the cheesecake is cold and very firm, scoop the cheesecake into 2-ounce balls and place on a parchment paper-lined baking sheet. Carefully insert a lollipop stick into each cheesecake ball. Freeze the cheesecake pops, uncovered, until very hard, at least 1 – 2 hours.

When the cheesecake pops are frozen and ready for dipping, prepare the chocolate. In the top of a double boiler, set over simmering water, or in a heatproof bowl set over a pot of simmering water, heat half the chocolate and half the shortening, stirring often, until chocolate is melted and chocolate and shortening are combined. Stir until completely smooth. Do not heat the chocolate too much or your chocolate will lose it's shine after it has dried. Save the rest of the chocolate and shortening for later dipping, or use another type of chocolate for variety.

Alternately, you can microwave the same amount of chocolate coating pieces on high at 30 second intervals, stirring until smooth.

Quickly dip a frozen cheesecake pop in the melted chocolate, swirling quickly to coat it completely. Shake off any excess into the melted chocolate. If you like, you can now roll the pops quickly in optional decorations. You can also drizzle them with a contrasting color of melted chocolate (dark chocolate drizzled over milk chocolate or white chocolate over dark chocolate, etc.) Place the pop on a clean parchment paper-lined baking sheet to set. Repeat with remaining pops, melting more chocolate and shortening (or confectionary chocolate pieces) as needed.

Refrigerate the pops for up to 24 hours, until ready to serve.


S

Sunday, 30 March 2008

March Daring Bakers Challenge - The Perfect Party Cake


Well, well, here we are at my eighth Daring Baker Challenge. Can you believe it? I certainly can’t! When I first signed up, I honestly thought I wouldn’t last, and look at me now. Yes, March’s DB Challenge went well, that’s why I sound so pleased with myself. There have been some disasters over the last 8 months, as well as some mediocre moment and some great results. Although I managed to make the process of making this challenge much more complicated than it needed to be, this month’s challenge goes into the category of great results.

My gorgeous friend Kate bakes and decorates the most exquisite cake for everyone, so when I noticed her birthday coming, I decided all these Daring Bakers Challenges I’d done lately helped my confidence enough to bake Kate a cake for her birthday.

A few days later the March Challenge was set by Morven The Perfect Party Cake – how more perfect could it be! What timing. I was really looking forward tho this challenge. I read the recipe through and felt relaxed, I knew the buttercream from our December Yule Log Challenge

I got myself organised, music was blaring, the doors were open, it was a gorgeous day outside. I scrubbed my house and got into the kitchen. Once the amazing lemon-scented sugar and butter was whizzing away in my fire-engine red Kitchen-Aid I went to preheat the oven.

For those of you who haven’t figured out I am quite the bimbo at times, you’ll know for sure now – the oven door was missing. Oh no! That’s right they took it away to be repaired. I totally forgot! There I was standing in the middle of my kitchen, nearly in tears; I was that cross with my own stupidity. I contemplated asking neighbours I’d never met before or plain old giving up. Eventually I called Kate (yes, the birthday girl) and explained. How ridiculous! Can I bake your birthday cake in your oven!?

I jumped into a taxi, Kitchen-Aid mixer bowl filled with batter and drove 15 minutes to her place. The chubby cabby asked 100 questions and made me feel even more like the Dumb Baker I was.

In the end, the cake came out wonderfully. Kate’s house smelt like freshly bakes cakes and I returned home to finish it all off and everyone loved it! I had visions of the batter collapsing or curdling but it held up wonderfully. I will definitely be making this cake again. Now, I ask you, was all that daring enough for you!?

Here’s what I did:

For the Cake
2 ½ cups cake flour (I used plain flour and removed 1 tbs of flour from each cup)
1 tbs baking powder
½ tsp salt
1 ¼ cups buttermilk
4 large egg whites
1 ½ cups sugar
2 tsp lemon zest
113 grams unsalted butter, at room temperature
½ tsp lemon extract


For the Buttercream
1 cup sugar
4 large egg whites
340 grams unsalted butter, at room temperature
¼ cup fresh lemon juice (from 2 large lemons)
1 tsp vanilla extract


For the filling
2/3 cup raspberry jam stirred vigorously or warmed gently until spreadable
About 1 ½ cups shredded coconut


Preheat the oven 175C and butter two 9 x 2 inch round cake pans, lining the bottom of each pan with a round of buttered baking paper. Put the pans on a baking sheet.

Sift together the flour, baking powder and salt.

Whisk together the sugar and lemon zest in a bowl and rub them together with your fingers until the sugar is moist and fragrant. Add the butter and working with the paddle or whisk attachment, or with a hand mixer, beat at medium speed for a full 3 minutes, until the butter and sugar are very light. Beat in the lemon extract, then add one third of the flour mixture, still beating on medium speed.

Beat in half of the milk-egg mixture, then beat in half of the remaining dry ingredients until incorporated. Add the rest of the milk and eggs beating until the batter is homogeneous, then add the last of the dry ingredients. Finally, give the batter a good 2-minute beating to ensure that it is thoroughly mixed and well aerated.

Divide the batter between the two pans and smooth the tops with a rubber spatula. Bake for 30-35 minutes, or until the cakes are well risen and springy to the touch – a thin knife inserted into the centre’s should come out clean

Transfer the cakes to cooling racks and cool for about 5 minutes, then run a knife around the sides of the cakes, unfold them and peel off the paper liners. Invert and cool to room temperature, right side up.

Now for the buttercream - put the sugar and egg whites in a mixer bowl or another large heatproof bowl, fit the bowl over a plan of simmering water and whisk constantly, keeping the mixture over the heat, until it feels hot to the touch, about 3 minutes.

The sugar should be dissolved, and the mixture will look like shiny marshmallow cream. Remove the bowl from the heat. Working with the whisk attachment or with a hand mixer, beat the meringue on medium speed until it is cool, about 5 minutes.

Switch to the paddle attachment if you have one, and add the butter a stick at a time, beating until smooth. Once all the butter is in, beat in the buttercream on medium-high speed until it is thick and very smooth, 6-10 minutes. During this time the buttercream may curdle or separate – just keep beating and it will come together again. On medium speed, gradually beat in the lemon juice, waiting until each addition is absorbed before adding more, and then the vanilla. You should have a shiny smooth, velvety, pristine white buttercream. Press a piece of plastic against the surface of the buttercream and set aside briefly.

To assemble the cake, cut the cakes horizontally in half, using a sharp serrated knife and a gentle sawing motion. Put one layer cut side up on a cardboard cake round or a cake plate protected by strips of parchment paper. Spread it with one third of the jam. Cover the jam evenly with about one quarter of the buttercream. Top with another layer, spread with jam and buttercream and then do the same with a third layer (you’ll have used all the jam and have buttercream leftover). Place the last layer cut side down on top of the cake and use the remaining buttercream to frost the sides and top.

Press the coconut into the frosting, patting it gently all over the sides and top.

The cake is ready to serve as soon as it is assembled, but it’s best to let it sit and set for a couple of hours in a cool room – not the fridge. Whether you wait or slice and enjoy it immediately, the cake should be served at room temperature; it loses all its subtlety when it’s cold.


If you would like to see what my fellow Daring Bakers did with this challenge please check out our Daring Baker’s Blogroll.


S

Friday, 29 February 2008

February Daring Bakers Challenge - French Bread


I somehow landed a whole Saturday to myself. Sitting in front of the Saturday morning music clips with coffee and hot cross bun I wondered what I could do. After a few sleepy minutes I realised the next Daring Bakers Challenge – Julia Child’s French Bread!

The challenge had been set about 2 or 3 weeks ago at this stage by Mary from Breadchick and Sara from I Like to Cook.


As I looked through the Daring Bakers discussion site I noticed many people were bowing out because this month’s challenge was too hard… Hmm how hard could it be I thought.

I then read the recipe (which took a long time!) and understood why people had had such a thought! Maybe I should consider bowing out gracefully myself…

I walked into the kitchen at 11am and cleaned everything to have a fresh canvas, and with that the games began. Some people said it took them 9.5 hours. I assume because I was in hot and humid Sydney, Australia I lucky as it only took me about 4 – 5 hours start to finish. The dough rose much quicker than the recipe indicated, both times.

And so, with all that time kneading, waiting for the yeast to do its job, and brushing the rolls with iced water every 3 minutes during their time in the oven they came out great! They were crunchy on the outside and soft on the inside. I was very pleased. I was surprised they were so salty, but I’m not complaining! What a treat that all this effort and time produced gorgeous little French dinner rolls. Thanks Mary and Sara.

We don’t have a printer at home, so I went up to a local internet café and printed the recipe. It was 11 pages! Therefore I am not posting it here. If you would like to check out the recipe, please find it here.

And, of course, if you would like to check out my fellow Daring Bakers, please do so here.


S

Tuesday, 29 January 2008

January Daring Bakers Challenge - Lemon Meringue Pie

Jen the Canadian Baker is the hostess with the mostess whom set January's Daring Baker's challenge. This is my sixth challenge with the wonderful group of supportive and inspiring bakers from all around the world.

Jen set us a Lemon Meringue Pie as something lighter after all the holiday treats. It was great. I didn't struggle with this challenge, which means this scary dare I set myself to join this awesome group has taught me something. I think the main reason I am having more success in the baking department, is to do with confidence and following the instructions to the letter. I'm one of those eh, I'll throw a bit f this or that in, so baking was never my forte.

We had people over the night I made this and I managed to make each part at different stages through my day in the kitchen and then assembled it as we sat down for dinner, set the timer jumped up 15 minutes later, allowed it to cool and served it about 2 hours later and it was a hit! Everyone loved it. So, thank you Jen for the gorgeous recipe and challenge and thank you fellow Daring Bakers for all your help and support in the last 6 challenges.

For the Crust:
180 grams cold butter; cut into ½-inch (1.2 cm) pieces
2 cups plain flour
¼ cup sugar
¼ tsp salt
⅓ cup iced water

For the Filling:
2 cups water
1 cup sugar
½ cup cornflour
5 egg yolks, beaten
¼ cup butter
¾ cup fresh lemon juice
1 tbsp lemon zest
1 tsp vanilla extract

For the Meringue:
5 egg whites, room temperature
½ tsp cream of tartar
¼ tsp salt
½ tsp vanilla extrac
t¾ cup sugar

For the Crust: Make sure all ingredients are as cold as possible. Using a food processor combine the butter, flour, sugar and salt. Process until the mixture resembles coarse meal and begins to clump together. Sprinkle with the iced water, let rest 30 seconds and then process very briefly just until the dough begins to stick together and comes away from the sides of the bowl. Turn onto a lightly floured work surface and press together to form a disk. Wrap in plastic and chill for at least 20 minutes.

Allow the dough to warm slightly to room temperature if it is too hard to roll. On a lightly floured board roll the disk to a thickness of ⅛ inch. Cut a circle about 2 inches larger than the pie plate and transfer the pastry into the plate by folding it in half or by rolling it onto the rolling pin. Turn the pastry under, leaving an edge that hangs over the plate about ½ inch. Flute decoratively. Chill for 30 minutes.

Preheat oven to 180ºC. Line the crust with foil and fill with metal pie weights or dried beans. Bake for 20 to 25 minutes.

Carefully remove the foil and continue baking for 10 to 15 minutes, until golden. Cool before filling.

For the Filling: Bring the water to a boil in a large, heavy saucepan. Remove from the heat and let rest 5 minutes. Whisk the sugar and cornstarch together. Add the mixture gradually to the hot water, whisking until completely incorporated.

Return to the heat and cook over medium heat, whisking constantly until the mixture comes to a boil. The mixture will be very thick. Add about 1 cup of the hot mixture to the beaten egg yolks, whisking until smooth. Whisking vigorously, add the warmed yolks to the pot and continue cooking, stirring constantly, until mixture comes to a boil. Remove from the heat and stir in butter until incorporated. Add the lemon juice, zest and vanilla, stirring until combined. Pour into the prepared crust. Cover with plastic wrap to prevent a skin from forming on the surface, and cool to room temperature.

For the Meringue: Preheat the oven to 190ºC. Using an electric mixer beat the egg whites with the cream of tartar, salt and vanilla extract until soft peaks form. Add the sugar gradually, beating until it forms stiff, glossy peaks. Pile onto the cooled pie, bringing the meringue all the way over to the edge of the crust to seal it completely.

Bake for 15 to 20 minutes, or until golden. Cool on a rack. Serve within 6 hours to avoid a soggy crust.

S

Saturday, 22 December 2007

December Daring Baker's Challenge - Yule Log


And so, it was time for my fifth Daring Bakers Challenge! I can’t believe it! I never believed I was worthy, let alone capable of successfully completing 5 challenges! (I had to skip November as our oven door exploded into hundred’s of pieces).

This month Lis and Ivonne, the creators of the Daring Bakers group I am a part of, took control and set the challenge - the Yule Log. I didn’t know anything about them. When I Googled it and saw a pic, I recognised it.

I waited till the last possible opportunity to make and give it as a Christmas gift to the gorgeous Madden sisters. I have to say, I went in pretty confident, didn’t really pay close attention. Somehow that worked for me, as I had no problems with the making side of things. I’ve been checking in on our Daring Bakers website, and quite a few people had problems with the buttercream, for example. I had made the genoise style cake previously and I have to tell you it was so much easier with my new sexy red KitchenAid!

Unfortunately, I got too big for my boots and forgot to put the cake smeared with the buttercream in the fridge before I rolled it up. Once the cake had cooled down I applied the buttercream and rolled it and the bloody thing cracked on each turn! Urgh. I was devastated! I powered on and smeared the whole thing with the best tasting frosting I have ever, ever made or tasted and tried to make it pass for a log. As you can see it didn’t have too much luck.

You need a piping bag for the meringue mushrooms. I don’t have one, but will be buying myself one soon! I tried to make my own from bakingpaper. Therefore, my mushrooms didn’t really work. Good trick though, I’d like to try them again.

I’m pleased with the cooking and tasting side of this fun December challenge.

The recipients of the Yule Log, loved it and said the taste was divine, so all was well in the end.
I’ll definitely be making this again and will endeavour to make it appear more like a log. I‘ll know when to pay attention!

If you’d like to see how the other Daring Bakers went please visit our blogroll.

Plain Genoise:
3 large eggs
3 large egg yolks
pinch of salt
¾ cup of sugar
½ cup plain flour
¼ cup cornflour

Coffee Buttercream:
4 large egg whites
1 cup sugar
340g unsalted butter, softened
2 tablespoons instant espresso powder
2 tablespoons brandy

one 10 x 15 inch jelly-roll pan that has been buttered and lined with parchment paper and then buttered again.

Set a rack in the middle of the oven and preheat to 200C.

Half-fill a medium saucepan with water and bring it to a boil over high heat. Lower the heat so
the water is simmering.

Whisk the eggs, egg yolks, salt and sugar together in the bowl of a heavy-duty mixer. Place over the pan of simmering water and whisk gently until the mixture is just lukewarm, about 100 degrees if you have a thermometer (or test with your finger - it should be warm to the touch).

Attach the bowl to the mixer and, with the whisk attachment, whip on medium-high speed until the egg mixture is cooled (touch the outside of the bowl to tell) and tripled in volume.

The egg foam will be thick and will form a slowly dissolving ribbon falling back onto the bowl of whipped eggs when the whisk is lifted.

While the eggs are whipping, stir together the flour and cornflour.

Sift one-third of the flour mixture over the beaten eggs. Use a rubber spatula to fold in the flour mixture, making sure to scrape all the way to the bottom of the bowl on every pass through the batter to prevent the flour mixture from accumulating there and making lumps. Repeat with another third of the flour mixture and finally with the remainder.

Scrape the batter into the prepared pan and smooth the top.

Bake the genoise for about 10 to 12 minutes. Make sure the cake doesn’t overbake and become too dry or it will not roll properly. (Mine only need 5 minutes).

While the cake is baking, begin making the buttercream.

Once the cake is done (a tester will come out clean and if you press the cake lightly it will spring back), remove it from the oven and let it cool on a rack.

Whisk the egg whites and sugar together in the bowl of an electric mixer. Set the bowl over simmering water and whisk gently until the sugar is dissolved and the egg whites are hot.

Attach the bowl to the mixer and whip with the whisk on medium speed until cooled. Switch to the paddle and beat in the softened butter and continue beating until the buttercream is smooth. Dissolve the instant coffee in the liquor and beat into the buttercream.

Filling and frosting the log:
Run a sharp knife around the edges of the genoise to loosen it from the pan.

Turn the genoise layer over (unmolding it from the sheet pan onto a flat surface) and peel away the paper.

Carefully invert your genoise onto a fresh piece of parchment paper.

Spread with half the coffee buttercream (or whatever filling you’re using).

Use the parchment paper to help you roll the cake into a tight cylinder.

Transfer back to the baking sheet and refrigerate for several hours.

Unwrap the cake. Trim the ends on the diagonal, starting the cuts about 2 inches away from each end.

Position the larger cut piece on each log about 2/3 across the top.

Cover the log with the reserved buttercream, making sure to curve around the protruding stump.

Streak the buttercream with a fork or decorating comb to resemble bark.

Transfer the log to a platter and decorate with your mushrooms and whatever other decorations you’ve chosen.

Meringue Mushrooms:
3 large egg whites, at room temperature
¼ teaspoon cream of tartar
½ cup sugar
1/3 cup icing sugar
Unsweetened cocoa powder for dusting

Preheat the oven to 110C.

Line 2 baking sheets with parchment. Have ready a pastry bag fitted with a small (no. 6) plain tip. In a bowl, using a mixer on medium-low speed, beat together the egg whites and cream of tartar until very foamy. Slowly add the granulated sugar while beating. Increase the speed to high and beat until soft peaks form when the beaters are lifted. Continue until the whites hold stiff, shiny peaks. Sift the icing sugar over the whites and, using a rubber spatula, fold in until well blended.

Scoop the mixture into the bag. On one baking sheet, pipe 48 stems, each ½ inch (12 mm.) wide at the base and tapering off to a point at the top, ¾ inch (2 cm.) tall, and spaced about ½ inch (12 mm.) apart. On the other sheet, pipe 48 mounds for the tops, each about 1-1/4 inches (3 cm.) wide and ¾ inch (2 cm.) high, also spaced ½ inch (12 mm.) apart. With a damp fingertip, gently smooth any pointy tips. Dust with cocoa. Reserve the remaining meringue.
Bake until dry and firm enough to lift off the paper, 50-55 minutes. Set the pans on the counter and turn the mounds flat side up. With the tip of a knife, carefully make a small hole in the flat side of each mound. Pipe small dabs of the remaining meringue into the holes and insert the stems tip first. Return to the oven until completely dry, about 15 minutes longer. Let cool completely on the sheets.

Garnish your Yule Log with the mushrooms.